Beyond Alteryx Macros – Alteryx’s JavaScript SDK: an unofficial guide
![]()
Since version 10.1 of Alteryx, there has been an HTML/JS SDK built in for creating custom tools. I have spent some time digging around and thought would share some tips on getting started. As with all tools within Alteryx, there are two parts to the tools – a configuration UI and an engine. This guide is looking at the UI side of the API as it stands at version 11.3 (though most of my playing was in 11.0). I will do another post on the Engine portion of the JavaScript SDK as well as one on how to do value previews within the designer (like the Formula tool or the Omnibus Regex tool). Please note, while I expect it to be reasonably fixed, I cannot guarantee it won’t change between versions as the SDK is still maturing.
As a simple demo, the idea in this post is to have a custom tool which will add a new column of data with the default value of Hello from JavaScript. The user will be able to name the column and change the value of the text. In the next post, I will get down and dirty into the guts of the Formula tool and its functions and callbacks, showing you how to do preview values and upgrading this demo to use a templated string.
The code in this post uses TypeScript as I wanted the typings file help. This post won’t cover any of the set up for TypeScript compilation. There is, however, no need to use it and you can work in vanilla JavaScript if you prefer. As Alteryx’s JavaScript engine is based on top of a recent version of the V8 engine, you can use virtually all of the ES6/2015 features.

Downloads
All of the code for this post is on GitHub:
- The HelloFromJS Tool
- Alteryx Designer Type Definitions
- Alteryx Engine Type Definitions
- YXI Powershell Script
- Final YXI File
JavaScript within Alteryx
Version 11 of a Alteryx is a fantastic demonstration of combining a traditional WinForms applications with HTML5 pieces. It is impressively seamless and integrated into the UI experience. In the screenshot below, both the universal search and the new data insights within the Browse tool are both written in HTML and JavaScript.
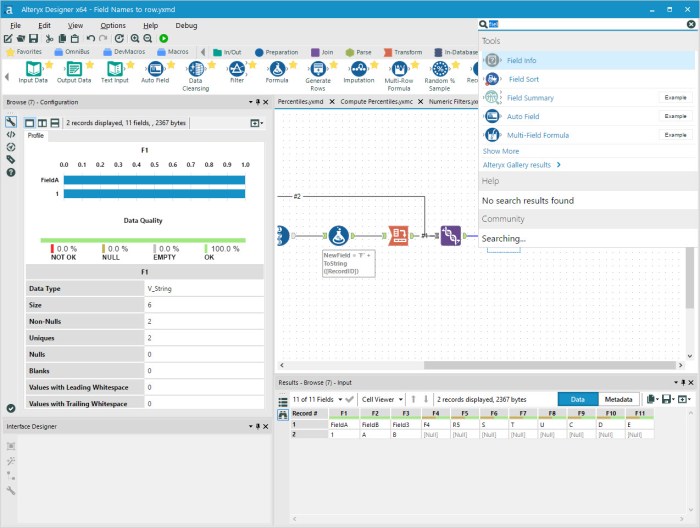
Various tools’ property UIs have been rewritten to use HTML – most notably the Formula tool but also various of the R-based tools (the Predictive and Prescriptive tools). Within the designer, the CEF is used to run these components.

Within the engine, there is no need for the graphical elements, but the entry point is still an HTML file running within a CEF environment.
One of the great features of the architecture of Alteryx is that there is no need to use the same language to develop the engine pieces as you do the UI. Alteryx themselves write their core tools using C++ for the engine and C# or HTML for the UI. If you have existing .Net or C++ custom tools, you can upgrade the UI to use HTML. The only complication which can be a little fiddly is to match the required configuration format out of the JavaScript. I believe you will also need to include the ‘ini’ file still to get the DLL loaded into Alteryx as well.
Digging into the SDK
Most of this post’s contents come from examining the source code of some of the pieces built into the Designer in version 11.0. Please note, in 11.3 these folders have been cleaned up, but the API is still the same I think.
If you want to take a look around, the first place to start is the bin\HtmlPlugins folder within Alteryx’s installation folder. All of the built-in plugins are in here. You will find different examples ranging from the simple RecordID (AlteryxBasePluginsGui.RecordID.RecordID) which calls a C++ based function, through to all the optimization plugins which use and R based macros behind them. Also, the new Formula tool (AlteryxBasePluginsGui.Formula.Formula) with it’s more advanced UI but still using the C++ code behind. There is also an example plugin in this folder (JavascriptPluginExample) which has lots of bits and pieces pointing you in the direction you might need to go.
The second location (and the one full of all the goodies in 11.0) is bin\RuntimeData\HtmlAssets\Shared\1\lib. In here you will find all the source for the types used by the SDK. You can also find some of the unit test files within this folder (within 11.0 only, unfortunately). These tests give an awful lot of insight into how to call the API and some of this guide is based on what I found examining these.
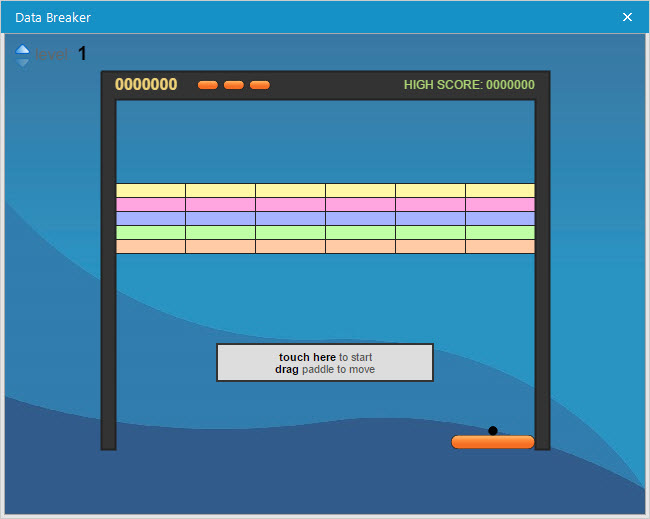
While you are in here if you look a couple of directories above you will find the Data Breaker Easter Egg. After that, all you need to do is work out how to start it within the designer!
Looking around at the plugin widgets in this location, it is easy to see they are using React for creating UI components (there are various JSX files). It is great as it is pretty easy to use these widgets for building your own tool’s UIs.
To make it a little bit easier to work with the SDK within TypeScript, I have stuck together a type definition file for the SDK as I see it. This file is not first-party supported, so while I’ll do my best to keep it in line with API and correct mistakes (I expect there will be a few in it!) I make no guarantees! It is not looking at the widget components only the classes supporting them at present.
Class Overview
The main class to start with is the Alteryx class. It is declared in the global space so you can access it as you need to. It has a few properties which tell you about the version of the engine and environment:
    export const AlteryxVersion: string // 11.0.6.28907
    export const SDKVersion: string // 10.1
    export const Platform: string // x64
    export const LibDir: string // C:\Program Files\Alteryx\bin\RuntimeData/HtmlAssets/Shared/
There is a function on it called JsEvent. This function is the magic hook to call back into to C# environment allowing you to do such things as getting values from the data flow, parse and evaluate formulae and so forth. That will be the subject of the next post.
The Gui property on the Alteryx object is where we can hook our custom tool into the lifecycle and do things. The class definition I have for it looks like:
    interface AlteryxGui {
        manager: Manager
        renderer: any

        Initialize(config: any): any
        GetConfiguration(): void
        SetConfiguration(args: any): any
        AttachObserver(): void

        getRecentAndSavedExpressions: () => void
        setRecentAndSavedExpressions: (expressions: recentAndSavedExpressions) => void

        BeforeLoad?: (manager: Manager, dataItems: AlteryxDataItems, json: any) => void
        AfterLoad?: (manager: Manager, dataItems: AlteryxDataItems) => void
        BeforeGetConfiguration?: (json: beforeGetConfiguration) => any
        Annotation?: (manager: Manager) => string
    }
This post will take a look at the manager in a moment. I haven’t been using the renderer property but believe this can be used to help render the UI, something to look at down the road!
The first four functions (Initialize, GetConfiguration, SetConfiguration and AttachObeserver) are used by Alteryx C# based designer to set up the plugin and read the settings after use. getRecentAndSavedExpressions and setRecentAndSavedExpressions are for the Formula tool, and I will cover these in the next post.
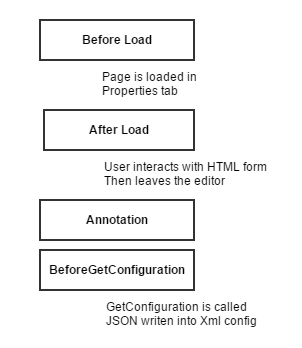
The final four functions allow you to control the how the XML configuration is converted into DataItems and then stored in the manager before being passed to any plugin-widgets or any other GUI parts. BeforeLoad is called before rendering the page. Alteryx will have made an attempt to convert the XML into a set of DataItems. A DataItem is just a class holding a value and allowing it to be observed so that on change associated HTML components can update. The manager is a Manager class which holds the set of DataItems and is responsible for rendering back into JSON. More details on these classes below. The dataItems argument gives you access to the module to create new DataItems in code.
After calling BeforeLoad, the page is then loaded into the Chromium browser and then Alteryx calls AfterLoad. This function gives you another opportunity to perform any page initialization you might need but with the DOM elements already available. It is a good chance to wire up actions on the DataItems change events, for example validating input.
The user can then interact with the web page to configure the tool. When they leave the page (for example by clicking on another tool or running the workflow), then Alteryx will get the default annotation and read out the configuration to serialize it back to the XML of the workflow. First, it calls the Annotation method passing the manager back to the code and expecting a string to be returned containing the default annotation for the tool.
Next, it serializes the manager‘s DataItem values to a single JavaScript object. It then calls BeforeGetConfiguration passing the data structure in as json.configuration and the annotation as json.annotation. This method allows you reshape the configuration object which will be saved into the XML. If you are aiming to match the configuration of an existing tool, this is the place to shuffle properties and shape as needed. For example, Alteryx often serializes boolean values into a ‘value’ attribute rather than being the InnerText of XML element. The code below shows the changes needed to the object to serialize it this way:
  json.Configuration.RegExExpression = [{
    '@value': json.Configuration.RegExExpressionTemp
  }]
  delete json.Configuration.RegExExpressionTemp
The Manager Class
The Manager class has a couple of important roles. As touched on above, it manages the DataItems within the UI, but it also allows you access the metadata of incoming connections. The class looks like:
    export class Manager {
        constructor(incomingMetaInfo: any, renderer: any)

        GetDataItems(): AlteryxDataItems.DataItem[]
        GetDataItem(id: string): AlteryxDataItems.DataItem
        GetDataItemByDataName(name: string): AlteryxDataItems.DataItem
        AddDataItem(item: AlteryxDataItems.DataItem): void
        RemoveDataItem(item: AlteryxDataItems.DataItem): void
        RemoveDataItemByDataName(dataName: string): void

        GetMetaInfo(input: number[]): FieldListArray | FieldList | undefined
        GetMetaInfoCopy(input: number[]): FieldListArray | FieldList | undefined
        CreateField(name: string, type: FieldType, size?: number, scale?: number, source?: string, desc?: string): FieldInfoManual

        toolId: number
        toolName: string

        macroMode: boolean
        isFirstConfig: boolean
    }
You get the ability to read in your tool’s id and name via properties. It also includes an isFirstConfig flag allowing you to set up default values more quickly. The functions split into two parts – MetaData and DataItems.
Data Items
The various GetDataItem functions allow you to access a DataItem representing one or more of the configuration properties. As you would expect, you can also add (AddDataItem) and remove (either by item RemoveDataIem or by name RemoveDataItemByDataName) items as well. This collection of DataItems will be used to form the configuration object and then the XML configuration within the workflow. The structure of a DataItem is:
    export class DataItem {
        constructor(dataname: string, id: string)

        dataName: string
        id: string
        suppressed: boolean

        getValue(): any
        setValue(newValue: any, updateWidgetUI?: boolean): void

        SetDependency(id: string, dataItem: DataItem): void
        GetDependency(id: string): DataItem

        BindDataChanged(func: (newValue:any) => void): void
        BindUserDataChanged(func: (newValue:any) => void): void

        StringToBoolean(input: string): boolean
        BooleanToString(input: boolean): string
    }
The dataName and id identify the DataItem. Both can be used to access the item within the manager. The id is used to name the property in the resulting configuration. So far I have found it easiest to have these two names be the same. The suppressed property stops the item being written out to the final configuration object.
The getValue and setValue functions give you access to the value of the DataItem. By using the setValue method, all observers are informed of an update via DataChanged (or UserDataChanged is user driven) events. The two bind functions allow you to hook onto changes to the value of the DataItem and change the UI appropriately. If you are using the plugin-widgets, they will automatically bind to these events and change appropriately.
The dependency functions within the DataItem class allow you to link items together and chain updates. I haven’t seen much use of these by Alteryx within their plugins and haven’t looked at these myself yet.
The remaining functions are internal serialization fixes. The Alteryx XML serialization of boolean values is to True and False whereas JavaScript serializes to true and false. These functions are just meant to help with this.
There are various specialized versions of the DataItem class. The first set (‘Simple’ ones) are for basic data types. There are also a few specialized ones. The table below shows some of the various classes and the values they can hold:
| Class | Description |
|---|---|
| SimpleBool | boolean (True/False) values |
| SimpleString | free text value |
| SimpleInt | integer value (uses JS parseInt function internally to restrict) |
| SimpleFloat | floating point value (uses JS parseFloat function internally) |
| SimpleDate | Date value stored as a string (in yyyy-MM-dd format by default) uses moment.js allowing for more formats as input |
| SimpleTime | Time value stored as a string (in HH:mm:ss format by default) uses moment.js allowing for more formats as input |
| SimpleDateTime | Time value stored as a string (in yyyy-MM-dd HH:mm:ss format by default) uses moment.js allowing for more formats as input |
| StringSelector | Fixed list of possible string values (adds StringList functions to allow setting) |
| MultiStringSelector | Fixed list of possible string values but choosing one or more as the value (extends StringSelector) |
| FileBrowseData | Either a file or folder name |
| FieldSelector | A Field Name from an incoming connection (read via MetaData and supporting type filtering, also allows for new fields) |
| FieldSelectorMulti | Multiple Field Name from an incoming connection (does not extend FieldSelector, and there are some API differences) |
There are various other, but these get into more specialized use. Also note, these haven’t been added to the typings file yet. I am sure this list will also increase as Alteryx expand the number of JavaScript tools:
- FormulaData: for the Formula tool
- LayoutData
- GridData
- SalesforceGridData
- SimpleGraph
- SimpleGraphData
- SimpleLineGraph
Meta Data
Looking at the MetaData side, this allows you read in the details of fields coming from upstream. It is worth noting that it is not the job of the configuration UI to produce the metadata for the downstream tools – this is part of the engine’s lifecycle. These functions are used internally by the FieldSelector items to create the list of fields.
The structure that is returned is a FieldList (or a FieldListArray which is just a collection of FieldLists). The GetField function allows you to get a FieldInfo object representing a single field. There are various GetFieldList which will get all or a filtered list (based on the value type) of fields. The code below shows the structure of the FieldInfo:
    export class FieldInfo {
        constructor (_name: string, _type: FieldType, _size: number, _scale: number, _source: string, _desc: string)
        strName: string
        strType: FieldType
        nSize: number
        nScale: number
        strSource: string
        strDescription: string
        GetFullSize(): string
    }

    export type FieldType = "Blob" | "Bool" | "Byte" | "Int16" | "Int32" | "Int64" | "FixedDecimal" | "Float" | "Double" | "String" | "WString" | "V_String" | "V_WString" | "Date" | "Time" | "DateTime" | "SpatialObj" | "Unknown"
This class is a pretty exact copy of the structure you get in C++ of C#. The field’s type is defined using strType, nSize and nScale. For most of the FieldTypes the size and scale are not relevant. For string types (String, V_String, WString, V_WString) the size is used to determine the maximum size. For FixedDecimal then you need to use both nSize and nScale.
Structure of a Plug-In
Now, to create a plugin. Alteryx will pick up plugins from the bin/HtmlPlugins folder within its install folder (we will cover an alternative installation using YXI files below). If you are like me, then you have an admin install of Alteryx, and this folder is protected by UAC. Fortunately, NTFS can create Junction Points. To do this start a command prompt as an administrator, go to the bin/HtmlPlugins folder and use mklink to create a Directory Junction. For example:
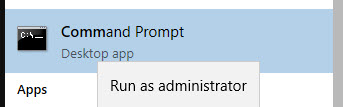
C:\WINDOWS\system32>cd "C:\Program Files\Alteryx\bin\HtmlPlugins"

C:\Program Files\Alteryx\bin\HtmlPlugins>mklink /J HelloFromJS D:\Repos\AlteryxAddIns\HelloFromJS
Junction created for HelloFromJS <<===>> D:\Repos\AlteryxAddIns\HelloFromJS
One nice benefit of this approach is that as you edit the HTML and JavaScript, Alteryx automatically picks up the new changes as it reads them every time the UI is displayed or the workflow is run. This behavior makes the development cycle massively shorter than with the .Net or C++ SDKs.
XML Configuration
The first file we need to create in here is the XML configuration file which tells Alteryx how to load the plugin. It needs to be called the same as the folder followed by Config.xml. Add the following content:
<?xml version="1.0"?>
<AlteryxJavaScriptPlugin>
  <EngineSettings EngineDll="HTML" EngineDllEntryPoint="HelloFromJS.html" SDKVersion="10.1"/>
  <GuiSettings Html="HelloFromJSGui.html" Icon="HelloFromJS.png" SDKVersion="10.1">
    <InputConnections>
      <Connection Name="Input" AllowMultiple="False" Optional="False" Type="Connection" />
    </InputConnections>
    <OutputConnections>
      <Connection Name="Output" AllowMultiple="False" Optional="False" Type="Connection" />
    </OutputConnections>
  </GuiSettings>
   <Properties>
    <MetaInfo>
      <Name>Hello from JavaScript</Name>
      <Description>Java Script example tool.</Description>
      <CategoryName>Developer</CategoryName>
      <SearchTags>javascript</SearchTags>
    </MetaInfo>
  </Properties>
</AlteryxJavaScriptPlugin>
This configuration file has various parts worth taking a quick look at.
Engine Settings
<EngineSettings EngineDll="HTML" EngineDllEntryPoint="HelloFromJS.html" SDKVersion="10.1"/>
This element tells the engine the location and type of the engine plugin it needs to load and the entry point within it to run. In this case, we are going to load an HTML file in the same folder called HelloFromJS.html. You can call onto existing C++ based or .Net based plugins as well. The example below if from the formula tool. It uses the AlteryxFormula class within the AlteryxBasePluginsEngine.dll:
<EngineSettings EngineDll="AlteryxBasePluginsEngine.dll" EngineDllEntryPoint="AlteryxFormula" SDKVersion="10.1" />
This value is copied as is straight into the workflows XML configuration.
Gui Settings and Connections
The attributes on the GuiSettings are for the designer side of Alteryx. These point to the entry point HTML and to the image that will be used in the toolbar. It also contains a list of the connections both incoming (InputConnections) and outgoing (OutputConnection). Each connection is defined by a single XML element with a few different attributes. The order they are listed in is the order they will be displayed on the tool.
| Attribute | Description |
|---|---|
| Name | Name of the connection |
| Type | Connection (haven’t seen any other values used here) |
| Label | Single letter label for connection (Optional) |
| AllowMultiple | Boolean flag to allow multiple inputs for an input connection (Defaults to false, ignored on outputs) |
| Optional | Is it a required connection (Defaults to true) |
The Icon specifies the relative path to the image to use. As with other Alteryx tools, this should be 171×171 png file:

Meta Data Settings
The last section allows you to specify metadata about the tool. This configuration is a significant improvement from the old .Net SDK where you couldn’t define these values at the individual tool level (Alteryx themselves did it by having entries within DefaultSettings.xml), hopefully, this will filter back into the other SDKs in later versions.
The first element, Name, specified the display name for the tool to use within the designer. The next element, Description, provides the text which the user will see if they hover over the tool within the ribbon. The CategoryName choose which group to display within. If not present then it will be added. If not specified then it will appear in the ‘Laboratory’ category.
You can also add SearchTags, which is a comma-separated list of values that will be used by the Global Search will use to find tools within Alteryx. These tags are optional but necessary if you want you tool to be found!
You can also add an Example element to provide some help for users to get started. It needs to be added to the MetaData section and if present will be shown as a link when the user hovers over the tool:
      <Example>
        <Description>Open Example</Description>
        <File>..\..\..\bin\HtmlPlugins\OmniBusRegex\OmniBusRegEx.yxmd</File>
      </Example>
The image below is taken from the OmniBus Regex tool but shows what the output looks like for a fully configured HTML tool:

Engine Entry Point: HelloFromJS.html
As specified in the EngineSettings, the Alteryx Engine will use the HTML engine to run the tool loading HelloFromJS.html. It is a relative path to the configuration directory. For this post the code is just provided as is, I will cover the engine and life cycle of a tool in a later post.
<html>
    <head>
        <script>
            document.write('<script src="' + window.Alteryx.LibDir + '1/lib/compiled/alteryx/engine/main.js"><\/script>');
        </script>
        <script src="HelloFromJS.js"></script>
    </head>
    <body>
    </body>
</html>
This file loads the Alteryx Engine’s JavaScript into the window then load the HelloFromJS.js file. In my case this is the out of a TypeScript compilation of HelloFromJS.ts file:
/// <reference path="../AlteryxEngine.d.ts" />
const globalConfiguration = {
    state: '',
    columnName: 'HelloFromJS',
    value: 'Hello from JavaScript'
}

Alteryx.Plugin.DefineConnections = () => {
    console.log('DefineConnections Called.')
    return {
        IncomingConnections: [{ type: 'Input' }],
        OutgoingConnections: [{ name: 'Output' }]
    }
}

Alteryx.Plugin.PI_Init = (config) => {
    console.log('PI_Init Called.')
    globalConfiguration.state = 'Inited'
    if (config.Configuration) {
        globalConfiguration.columnName = config.Configuration['ColumnName'] || globalConfiguration.columnName
        globalConfiguration.value = config.Configuration['Value'] || globalConfiguration.value
    }
}

Alteryx.Plugin.II_Init = (metaInfo) => {
    console.log(`II_Init Called: ${metaInfo.Connection}.`)
    globalConfiguration.state = 'Connected'
    const newField: Alteryx.RecordFieldInfo = { name: globalConfiguration.columnName, type: 'V_WString', size: 64532 }
    Alteryx.Engine.SendMessage.RecordInfo('Output', { Field: [...metaInfo.RecordInfo.Field, newField] })
}

Alteryx.Plugin.II_PushRecords = (data) => {
    console.log(`II_PushRecords Called: ${data.Connection}.`)
    Alteryx.Engine.SendMessage.PushRecords('Output', data.Records.map(r => [...r, globalConfiguration.value]))
    Alteryx.JsEvent(JSON.stringify({ Event: 'PushRecords', Connection: 'Output', ToolProgress: data.Progress, Records: '[]' }))
}

Alteryx.Plugin.II_AllClosed = () => {
    console.log('II_AllClosed Called.')
    globalConfiguration.state = 'Closed.'
    Alteryx.Engine.SendMessage.CloseOutput('Output')
    Alteryx.Engine.SendMessage.Complete()
}

Alteryx.Plugin.PI_Close = () => {
    console.log('PI_Close Called.')
    if (globalConfiguration.state === 'Inited') {
        Alteryx.Engine.SendMessage.Error('HelloFromJS requires an Input connection')
    }
    Alteryx.Engine.SendMessage.PI_Close()
}
Again I have a type definition file to help when working on the engine side of the SDK.
Gui Entry Point: HelloFromJSGui.html
So at this point, we have a tool configuration and an engine to run it. If you opened Alteryx and went to the Developer tab, you would find the new icon waiting there. It would also work and add the default column and value but has no designer yet:

To create the UI again we need to create the HTML entry point. Create a new file called HelloFromJSGui.html with the following content:
<!DOCTYPE html>
<html>
<head>
    <meta charset="UTF-8">
    <title>Hello From JavaScript</title>
    <script type="text/javascript">
        document.write(`<link rel="stylesheet" type="text/css" href="${window.Alteryx.LibDir}1/css/alteryx-config.css">`)
        document.write(`<link rel="stylesheet" type="text/css" href="${window.Alteryx.LibDir}1/lib/alteryx/gui/plugin-widgets/alteryx-desktop-widgets.css">`)
        document.write(`<link rel="stylesheet" type="text/css" href="${window.Alteryx.LibDir}1/lib/build/designerDesktop.css">`)
        document.write(`<script src="${window.Alteryx.LibDir}1/lib/build/designerDesktop.bundle.js">\x3c/script>`)
    </script>
    <script src="HelloFromJSGui.js"></script>
    <style>
.alteryx-toggle-switch-outer {
  position: absolute;
  right: 4px;
}
    </style>
</head>
<body>
</body>
</html>
This HTML file will load the required CSS files and JS for the Alteryx PlugIn widgets and frameworks. There is a small correction to the CSS that I found I needed to apply which makes the toggle switches appear on the right-hand side of the UI (as seems to be the norm within the R-based tools). It will load the JavaScript for the UI from HelloFromJSGui.js. Again in my case, I am using Typescript, so this is the output of the TypeScript compiler from HelloFromJSGui.ts. Before looking at the code, first, need to add a form for the user to manipulate. Add the following to the body of the HTML:
    <form>
        <fieldset>
            <legend class='blueTitle'>New Field</legend>

            <label for="fieldName">Column Name</label>
            <alteryx-pluginwidget type="TextBox" id="fieldName" dataName="ColumnName"></alteryx-pluginwidget>
            <label for="fieldName" style="color:red" id="fieldNameValid"></label>

            <label for="fieldValue">Value</label>
            <alteryx-pluginwidget type="TextBox" id="fieldValue" dataName="Value"></alteryx-pluginwidget>
        </fieldset>
    <form>
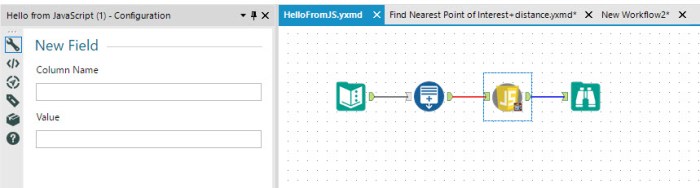
Now if we access the tool in Alteryx you get the initial UI:
Now for the TypeScript code behind:
/// <reference path="../AlteryxDesigner.d.ts" />

Alteryx.Gui.BeforeLoad = (manager, dataItems) => {
  if (!manager.GetDataItemByDataName('ColumnName')) {
    manager.AddDataItem(new dataItems.SimpleString({ dataname: 'ColumnName', id: 'ColumnName', initialValue: 'HelloFromJS' }))
  }
  if (!manager.GetDataItemByDataName('Value')) {
    manager.AddDataItem(new dataItems.SimpleString({ dataname: 'Value', id: 'Value', initialValue: 'Hello From JavaScript' }))
  }
}

Alteryx.Gui.AfterLoad = (manager) => {
  const ColumnNameItem: AlteryxDataItems.SimpleString = manager.GetDataItemByDataName('ColumnName')
  ColumnNameItem.BindUserDataChanged((newValue) => {
    const newString: string = (newValue || '').toString()
    const element = document.getElementById('fieldNameValid')
    if (element) element.innerHTML = (newString.trim() === '') ? 'You must enter a field name' : ''
  })
}

Alteryx.Gui.Annotation = (manager) => {
  const ColumnNameItem: AlteryxDataItems.SimpleString = manager.GetDataItemByDataName('ColumnName')
  const ValueItem: AlteryxDataItems.SimpleString = manager.GetDataItemByDataName('Value')
  return `${(ColumnNameItem.getValue())}:\r\n${ValueItem.getValue().replace(/^(.{27}).{3,}/, '$1...')}`
}

Alteryx.Gui.BeforeGetConfiguration = (json) => {
  if ((json.Configuration.ColumnName || '').trim() === '') {
    json.Configuration.ColumnName = 'NewJSColumn'
    json.Annotation = `NewJSColumn:\r\n${(json.Annotation || '').replace(/^.*?:\r\n/, '')}`
  }
  return json
}
This sample covers the basics of creating a configuration UI. The BeforeLoad method will set up default values for ColumnName and Value. AfterLoad is used to validate the entry, warning the user if they haven’t entered a column name. The Annotation function constructs the default annotation from the manager’s values. It uses the standard convention Alteryx use of truncating string after 30 characters. Finally, the BeforeGetConfiguration puts in a default column name if the user has deleted it.
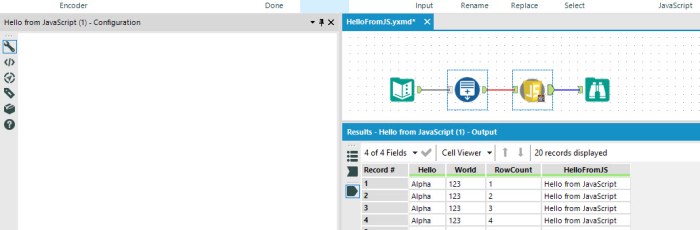
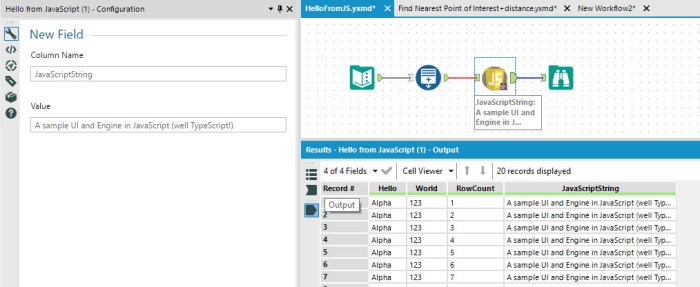
The final UI and results look like:
Installation via YXI Files
The easiest way to package and install an HTML custom tool is via the YXI format Alteryx use. Alteryx use this for some of their extensions such as the Google sheets tools. The format is just a zip file. If you rename it from yxi to zip, you can take a look inside. Inside you will find:
- A
Config.xmlspecifying the metadata of the plugin - An image file (whose name is specified in the configuration file)
- One or more folders containing the actual plugins
The code below shows the Config.xml for the HelloFromJS tool created in this post
<?xml version="1.0"?>
<AlteryxJavaScriptPlugin>
    <Properties>
        <MetaInfo>
            <Name>HelloFromJS</Name>
            <Description>Java Script example tool.</Description>
            <ToolVersion>1.0.0.0</ToolVersion>
            <CategoryName>Developer</CategoryName>
            <Author>James Dunkerley</Author>
           <Icon>HelloFromJS.png</Icon>
        </MetaInfo>
    </Properties>
</AlteryxJavaScriptPlugin>
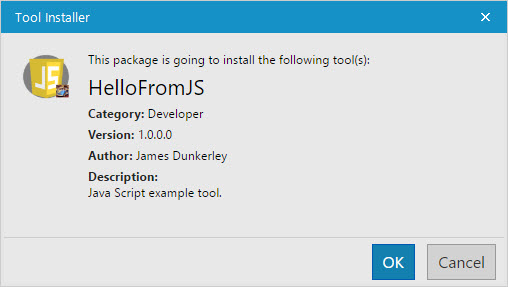
It is the information which will be displayed to the users when they install the yxi file:
The PowerShell script below will create the YXI from a given folder:
param($folder, $version)
$ErrorActionPreference = "Stop"

$dom = $env:userdomain
$usr = $env:username
$fullName = ([adsi]"WinNT://$dom/$usr,user").fullname

$folder = Resolve-Path $folder
$name = Split-Path $folder -Leaf
$parent = Split-Path $folder -Parent

$temp = $([System.IO.Path]::GetTempFileName())
Remove-Item $temp
New-Item $temp -type directory
push-location $temp
New-Item $name -type directory

$config = Get-Content "$folder\${name}Config.xml"
$category = @(@($config -split "\n") -match '.*CategoryName.*')[0] -replace ".*<CategoryName>(.*)</CategoryName>.*",'$1'
$description = @(@($config -split "\n") -match '.*Description.*')[0] -replace ".*<Description>(.*)</Description>.*",'$1'

$configFile = Join-Path $temp "Config.xml"

Set-Content $configFile -Value '<?xml version="1.0"?>'
Add-Content $configFile -Value '<AlteryxJavaScriptPlugin>'
Add-Content $configFile -Value '    <Properties>'
Add-Content $configFile -Value '        <MetaInfo>'
Add-Content $configFile -Value "            <Name>$name</Name>"
Add-Content $configFile -Value "            <Description>$description</Description>"
Add-Content $configFile -Value "            <ToolVersion>$version</ToolVersion>"
Add-Content $configFile -Value "            <CategoryName>$category</CategoryName>"
Add-Content $configFile -Value "            <Author>$fullName</Author>"
Add-Content $configFile -Value "           <Icon>$name.png</Icon>"
Add-Content $configFile -Value '        </MetaInfo>'
Add-Content $configFile -Value '    </Properties>'
Add-Content $configFile -Value '</AlteryxJavaScriptPlugin>'

Get-ChildItem $folder -Exclude '*.ts', '*.map', 'node_modules', '*.bak', 'yarn.lock', 'package.json', 'ts*.json' | Copy-Item -Destination "$temp\$name"
Compress-Archive -Path ("$folder\$name.png", $configFile, "$temp\$name") -DestinationPath "$temp\$name.zip" -Verbose -Update

$target = "$parent\${name}_$version.yxi"
if (Test-Path $target) {
    Remove-Item $target
}

Move-Item "$temp\$name.zip" $target
Pop-Location
Remove-Item $temp -Recurse -Force
It is set up to ignore the TypeScript files and other support files needed to make the plugin. It reads a lot from the tools config and makes an assumption that the icon for the tool is named the same as the tool with a png extension. To run you just need to give a path and a version: .\CreateYXI.ps1 .\HelloFromJS 1.0.0.0.
Congratulations – that is it. We have created a new tool and an installer for other people to use!
What’s Next
In the next post, I will take a look at how to use the JsEvent function and callbacks to create value previews. It will cover a rough overview of how the v11 Formula tool works, and I will also cover how the Omnibus Regex tool works as well.
Following that, I plan to move on to look at the Engine side of the SDK and cover how it works within JavaScript.

When I execute the PowerShell script to make the YXI file and then try running the YXI file I get an error along the lines of the .YXI file “not being a supported install type”. Is there anything I am doing wrong? Do I need to have these files in a specific folder before I run?
LikeLike
Shouldn’t need anything. I’ll check the script when I get home. Which version of Alteryx are you using?
LikeLike
11.0.6.28907
Thanks for the quick response!
LikeLike
Weird. I wrote most of this post using 11.0 (I am on 11.3 now). I tested the post on mine passing in both a folder name and version as well as not having a version and it all seems to be working.
I suggest you rename the resulting .yxi file to .zip and take a look inside. If the script worked correctly there should be a folder with the add-in you are trying to package and a config and png file. The config should look like the one shown above.
If you want to drop me an email or DM on twitter/Alteryx community feel free.
LikeLike
Pingback: Beyond Alteryx Macros – The Alteryx SDK and API Landscape | James Dunkerley's Blog