I have been meaning to upgrade my source code hosting and build process for a website I run from SVN to git in VSTS and finally got around to doing it. These are few of my tips I found in the process using Ubuntu on WIndows 10.
Ubuntu (or other distributions) on Windows
For the last couple of years, Microsoft have been working on the Windows Subsystem for Linux. This is a fantastic feature that allows for runnng a Linux shell within the Windows 10 environment. What’s great about this is it is not a virtual machine, it is a layer writen to translate Linux calls onto the NTFS system beneath. There is a series of blog post covering the architecture.
Currently, it is limited to NTFS fixed drives and you cannot access removable media. The C:\ drive is mounted as /mnt/c/. A lot of things work – there is a list of commands and how well they work on GitHub.
There was quite a big change in it within the Fall Creators Update allowing you to choose the distribution to install. Currently, there are:
- Ubuntu
- openSUSE
- SUSE Linux Enterprise Server
There is also supposed to be Fedora but I couldn’t find it.
You will need to install the Windows Subsystem for Linux which is optional Windows Feature. Go to the old Programs and Features window within Contol Panel and select ‘Turn Windows features on or off’:

Inside the new window at the bottom you will find the Windows Subsystem for Linux:

Once installed then go to the Windows Store and pick your distribution and install:

It will ask you to set your username and password up for use within Linux. It’s not linked to your Windows password, which brings me to my next little tip.
Resetting your Linux Password
In general, you don’t need the password to work with the Linux shell. It can just be started by running ubuntu (assuming that was the chosen distribution) at the command prompt. If however, you need to sudo to perform an action then you will be asked for your password. I’d installed it ages ago (when it was first in tech preview) and had forgotten. To reset run:
- Run
ubuntu config --default-user rootwhich will make it log on as root when you run it - Next run
ubuntuto start a shell as root - Inside the shell run
passwdand reset the password - Exit the shell
- Run
ubuntu config --default-userto re-configure back to the specified user
I had one additional difficulty that the ubuntu command didn’t work. I suspect this was due to having upgraded from the technical preview and being on an insider build but if it happens to you as well you can repair the install by going to Ubuntu inside Apps & Feaures and then to Advanced options. Inside there click Repair and hopefully the ubuntu command will work again!

GIT-SVN
This guide is based on a great post by John Albin on Converting a Subversion Repositry to Git.
First, you will need to install Subversion into Ubuntu. Run sudo apt install subversion. The svn command should then work. You can run svn --version to check it is working. You should now be able to run:
svn log -q | awk -F '|' '/^r/ {sub("^ ", "", $2); sub(" $", "", $2); print $2" = "$2" "}' | sort -u > authors-transform.txt
Which will generate a file called authors-transform.txt which you can amend to have the correct details for git. It is worth noting that you have some fun interop options working with the WSL. If you have Visual Studio Code installed on Windows then you can run code in the shell and it will open.
For the next stage we need to have git-svn. To install this run:
sudo add-apt-repository ppa:git-core/ppa
apt-get update
sudo apt-get update
sudo apt-get install git-svn
Back to John’s guide. Run:
git svn clone --no-metadata -A authors-transform.txt --stdlayout ~/temp
This will check out the SVN repository into a local git repository on your PC in ~/temp. At this stage, I had what I needed and chose to add a clean .gitignore file configured for the language rather than following the rest of John’s instructions.
Pushing to Visual Studio git
Last step is to publish the new git repository to VSTS. To generate an SSH key run:
ssh-keygen -C
cat ~/.ssh/id_rsa.pub
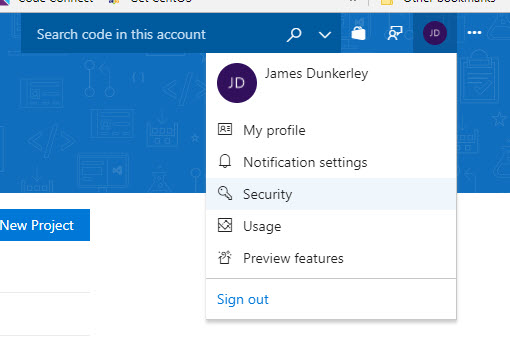
You can then copy this key and add it to your Visual Studio by going to Security under the account menu:
Go to SSH public keys and then click add:

Give the key a label and then paste the data into the Key Data section.
Next, create the project within VSTS with git as the source control. There will be a page with the instructions of how to push to git:
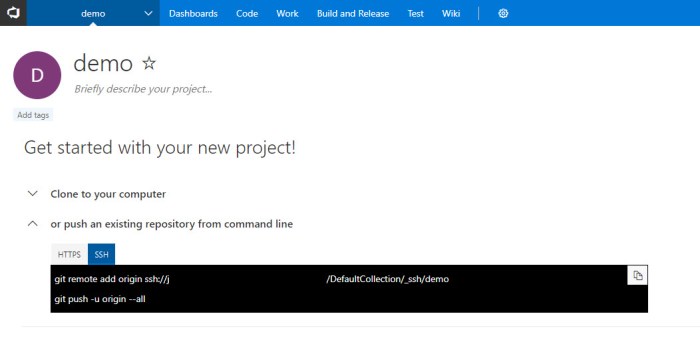
Choose SSH from inside 'push an existing repository from command line'. Something like:
git remote add origin ssh://demoaccount@vs-ssh.visualstudio.com:22/DefaultCollection/_ssh/demo
git push -u origin --all
You can now clone the repository where ever you need by running (updating the repository url):
git clone ssh://demoaccount@vs-ssh.visualstudio.com:22/DefaultCollection/_ssh/demo


